The 3-Step Stimulation Peel from Dr. Zein Obagi uses a combination of TCA, retinol, salicylic acid, lactic acid and glycerine to peel and renew the entire surface of your face in just 7 days, resulting in silky smooth, baby-soft skin. It sounded quite intense, yet instantly appealing! I was definitely keen to give it a go. So, before you could say Jack Robinson, I’d booked a peeling for 2 January. What did I have to lose? 2019 had been and gone and, as far as I was concerned, my ‘old skin’ could go along with it. Bring on the new year and my radiant new skin; that’s what I thought! You can read more about my experience and view the photo reportage of the days immediately following the treatment here.
Our consultant Kristel undergoes a 3-step peel

The preparation
The ZO 3-Step Stimulation Peel is not something that you can undergo just like that. You first have to thoroughly prepare your skin to ensure a smooth and speedy recovery. You’re aiming for the ‘wow factor’ after all. So, last September I had a high resolution, in-depth image of my face taken using the Visia Reveal camera and used the resulting skin analysis to devise a personalised ZO Skin Health product protocol. The conclusion: I had oily skin with widespread redness and lots of pigmentation.
My cleansing ritual consequently consists of Exfoliating Cleanser, Exfoliating Polish and Oil Control Pads. I then apply Daily Power Defense followed by two additional serums: Rozatrol serum for combatting redness and Brightalive serum for reducing pigmentation. I mix this latter serum with ‘Hydroquinon’, which was prescribed by the Van Lennep Clinic’s cosmetic doctors. This reduces pigment cell activity still further and helps to achieve more rapid results. As a final step, I apply Daily Sheer sunscreen with an SPF of 50 during the day. It might sound a ‘lot’ of work, but it only takes me 3 minutes. At night-time, it’s important to build up retinol in addition to the cleansing and serums. I alternate two extremely effective products: Wrinkle & Texture Repair 0.5% and Retinol Skin Brightener 1%.
This all-encompassing protocol served as my preparation for the peeling. It actually took a few months before my face could tolerate retinol every night. After sticking to this product regime for approximately 2.5 months, I noticed a dramatic improvement in my skin. It felt wonderfully soft and took on a smoother, firmer, more radiant appearance.

The day of the peeling
2 January is D-day and I’m feeling a tad apprehensive. Skin therapist Danique and intern Ruby take preliminary photos and ask me to sign the treatment agreement for the peeling. They then explain the procedure step by step.
My skin is thoroughly cleansed, and the peeling subsequently applied to my face in 3 phases. The application of the solution almost instantly induces an intense burning and ‘throbbing’ sensation in my face. Fortunately, they use a fan to cool my skin and after 3 minutes the worst of the burning is over. Once Danique is happy that my entire face is covered with a good, even layer of ‘frosting’ she applies the 6% Retinol cream, which will promote the peeling process over the coming days.
The final step is Revitatrol, a calming and restorative post-procedure product. After 30 minutes it’s all over. Thankfully my car is parked nearby, because my face is noticeably red and blotchy. It retains a faint burning sensation for the rest of the evening, and the skin itself is red and sensitive to the touch. Thank goodness I had the foresight to keep my diary free from social commitments this weekend!

The day after the peeling
I’m allowed to gently cleanse my face using Hydrating Cleanser. My face is redder than normal and there’s lots of swelling on my cheeks and cheekbones. The skin itself feels slightly numb. After cleansing, I apply the sachet containing 6% Retinol cream and a layer of Hydrating cream to soften and soothe my skin. I received both of these products immediately following the peeling treatment. My skin is extra sensitive to daylight during this period, so I apply a generous layer of Sunscreen + Primer SPF 30 and repeat several times a day.

Day 2 to 8
The peeling process has now begun! My skin is becoming increasingly tighter and the first loose pieces of skin start to form around my nose and mouth. Which isn’t surprising when you consider that these are the areas of your face that are subject to the most movement. I’m not allowed to pick at the skin, and it’s difficult to leave it alone. The loose pieces of skin slowly curl up and turn hard. Over the next few days, I affectionately refer to them as ‘my crusts’.
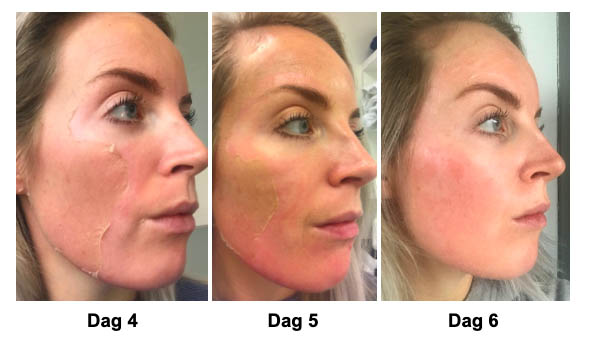 I carefully trim the longer pieces of skin using a pair of vanity scissors in an attempt to remain somewhat presentable. The new skin is still quite pink, so I apply the SPF several times a day. From days 3 and 4 onwards, the skin that’s yet to peel becomes darker and darker, just like the skin of snake prior to shedding. After 5 days the only pieces of ‘old skin’ that still remain are on my cheeks and forehead, lightly pulling down my right eyelid as you can see in the photo.
I can’t wait for the peeling process to end. The skin has now fully recovered on and next to my nose and around my mouth, and I can already observe excellent results; my skin is perfectly smooth and even, and the pores visibly smaller. After 8 days the peeling is over. My skin is still a little pink and delicate in places, so I only apply Hydrating Cleanser, Daily Power Defense and Sunscreen + Primer SPF 30.


The end result – after 12 days
I took the final photo 12 days after the peeling treatment, in order to thoroughly assess the end result. I’m entirely free of pigmentation spots and my skin is wonderfully smooth and healthy. The coarse pores around my nose and dry lines on my forehead have also disappeared. All I need is a little blusher, contouring and Hydration Spray from the Jane Iredale mineral makeup line and I’m ready to face the day!
Tip: The next time I’ll make sure that I block out more time in my diary, because the peeling took longer than I’d originally anticipated. This made me feel slightly uncomfortable in my local supermarket and cafes and restaurants etc. So, mentally it was a bit of a ‘challenge’. Now that it’s all over, I’m delighted with the results and it’s definitely something that I plan to have done on an annual basis as part of my beauty maintenance regime.
Do you suffer from rough, uneven skin or wish to reduce the appearance of acne scars (PIH) or pigmentation marks? The 3-Step Stimulation Peel might be the perfect solution for you! See for more information the page ‘Chemical Peelings.


![]()
![]()
![]()